Salesforce to Xero Integration via Apex
Table Of Content
Overview of Integration
If you are using Salesforce and Xero for your business, you may want to integrate these two systems. Integrating Salesforce with Xero will allow you to easily create or read Xero Customers and Invoices. While pre-built Xero Salesforce Integration may not be sufficient for your business needs, you can write custom Apex and develop your own solution. In this post, you will learn how to do it!
To integrate Xero with Salesforce, you’ll need admin access to Xero and admin access to Salesforce (Enterprise Edition or higher, or a Dev/Sandbox org for testing). You’ll also need some experience with Apex code. If you lack experience with Apex, you may want to consider using a no-code integration with Zapier or use Breadwinner’s no-code integration between Salesforce and Xero.
Remote Site Settings
To make a callout to an external website from Salesforce, it is crucial to register the target site in the Remote Site Settings. If the site is not registered, the callout will fail because Salesforce restricts calls to unregistered network addresses.
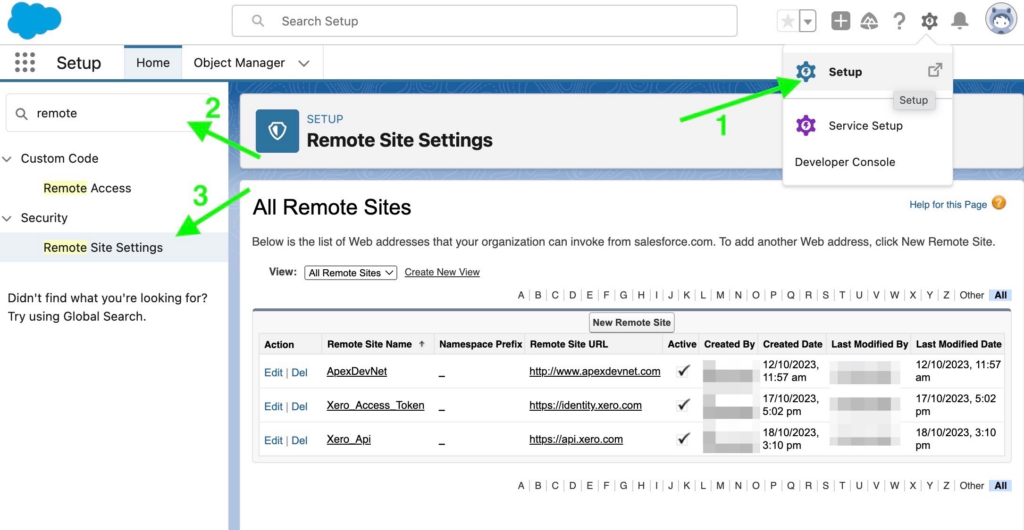
Before calling Xero Endpoints, we need to create two remote site settings in Salesforce. Follow these steps to create them:
- Go to Setup.
- In the Quick Find search bar, enter “Remote Site.”
- Click on “Remote Site Settings.”
- Create the following two remote site settings, each serving a specific purpose.
- For authentication and obtaining the Access Token, use:
URL: https://identity.xero.com/ - For performing operations on data, such as Contacts, Invoices, Bills, or Purchase Orders, use:
URL: https://api.xero.com/
- For authentication and obtaining the Access Token, use:

Connecting to Xero using OAuth 2.0 Custom Connection
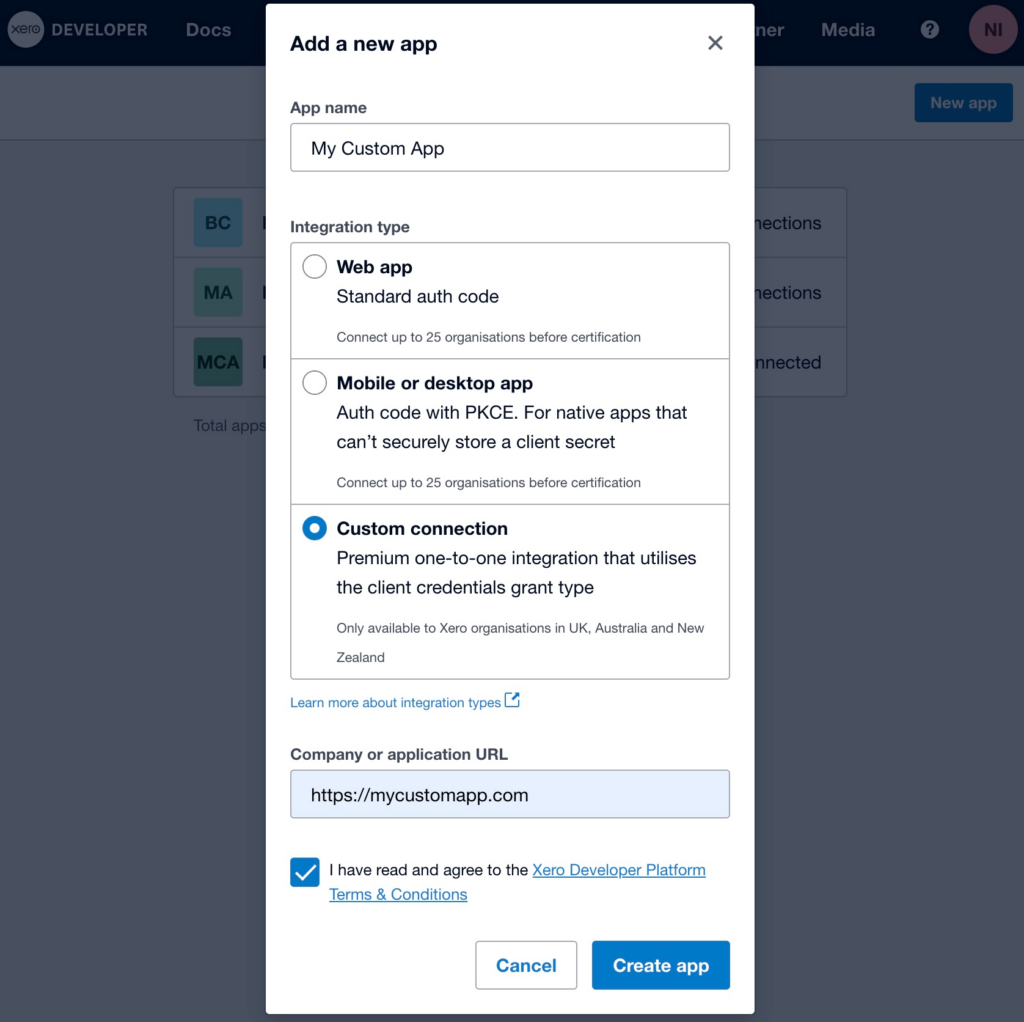
To create a Custom Connection App on Xero, navigate to “https://developer.xero.com,” then go to the “My Apps” section and provide all the necessary details. Once you have completed the application configuration, you can obtain your unique Client ID and Client Secret. Please note that your Client ID and Secret will look different from the examples given.
Client ID: 8459AA********************5C8E0
Client Secret: 3hZBw*********************************895nPi

You can use the above-generated codes to obtain the Access Token by requesting the endpoint “https://identity.xero.com/connect/token.”
Please see the sample code provided below.
public class XeroAuth {
    public static string getAccessToken(){
        String clientId = '8459AAB84EAB44D9920C55129325C8E0';
        String clientSecret = '3hZBwUojX67IJRJKcdJnyz1N4wU_-A4FQEwob8pVgY895nPi';
        Blob headerValue = Blob.valueOf(clientId + ':' + clientSecret);
        String authorizationHeader = 'Basic ' + EncodingUtil.base64Encode(headerValue);
        String payload = 'grant_type=client_credentials&scope=accounting.transactions accounting.contacts';

        HttpRequest req = new HttpRequest();
     	req.setEndpoint('https://identity.xero.com/connect/token');
     	req.setMethod('POST');
        req.setHeader('Authorization', authorizationHeader);
        req.setHeader('Content-Type', 'application/x-www-form-urlencoded');
        req.setBody(payload);

        Http http = new Http();
     	HTTPResponse res = http.send(req);

        if(res.getStatusCode() != 200 && res.getBody() != NULL){
            String respBody = res.getBody();
        	Map<String, Object> respMap = (Map<String, Object>)JSON.deserializeUntyped(respBody);
		if(respMap.containsKey('access_token'))
            	return String.valueOf(respMap.get('access_token'));
        }

        return null;

    }
}
Use the Access Token generated (which is valid for 1800 seconds) from the above class for any further requests.
Xero Contacts
Reading Contacts
Use the following code to retrieve Xero Contact(s) information from Xero. You can also access individual Xero Contact information by specifying the “IDs” parameter within the endpoint.
public class XeroContact {
	public static final String apiEndpoint = 'https://api.xero.com/api.xro/2.0/';

    public static String getAllXeroContacts(){
        String accessToken = XeroAuth.getAccessToken();
        system.debug(accessToken);

        if(accessToken != NULL){
            HttpRequest req = new HttpRequest();
            req.setEndpoint(apiEndpoint+'Contacts');
            req.setMethod('GET');
            req.setHeader('Authorization', 'Bearer '+accessToken);
            system.debug(req);

            Http http = new Http();
            HTTPResponse res = http.send(req);

            if(res.getStatusCode() == 200 && res.getBody() != NULL){
                String contactsJSONResponse = res.getBody();
                system.debug(contactsJSONResponse);
                return contactsJSONResponse;
            }
        }
        return null ;
    }
}
You can retrieve individual Xero contacts with the provided code by including the “IDs” parameter, as shown in the following endpoint.
https://api.xero.com/api.xro/2.0/Contacts?IDs=220ddca8-3144-4085-9a88-2d72c5133734,88192a99-cbc5-4a66-bf1a-2f9fea2d36d0
Managing Xero Contacts – Creation and Update
When creating a Xero Contact, certain mandatory fields should be provided as per the Xero API regulations. On the other hand, when updating a Xero Contact, it is crucial to include the “ContactID” in the request body.
The code below can be used for both creating and updating a Xero Contact based on the value of the “isCreate” parameter.
If the “isCreate” parameter is set to TRUE, then the request method will be configured as PUT, otherwise, it will be configured as POST.
public class XeroContact {
    public static final String apiEndpoint = 'https://api.xero.com/api.xro/2.0/';

    public static String createUpdateXeroContact(Boolean isCreate){
        String accessToken = XeroAuth.getAccessToken();
        system.debug(accessToken);

		if(accessToken != NULL){
			String jsonBody = '{ "Contacts": [ { "Name": "Bruce Banner", "EmailAddress": "hulk@avengers.com", "Phones": [ { "PhoneType": "MOBILE", "PhoneNumber": "555-1212", "PhoneAreaCode": "415" } ], "PaymentTerms": { "Bills": { "Day": 15, "Type": "OFCURRENTMONTH" }, "Sales": { "Day": 10, "Type": "DAYSAFTERBILLMONTH" } } } ] }';

            HttpRequest req = new HttpRequest();
            req.setEndpoint(apiEndpoint+'Contacts');
            req.setMethod(isCreate ? 'PUT' : 'POST');
            req.setHeader('Authorization', 'Bearer '+accessToken);
            req.setHeader('Content-Type', 'application/json');
            req.setHeader('Accept', 'application/json');
            req.setBody(jsonBody);
            system.debug(req);

            Http http = new Http();
            HTTPResponse res = http.send(req);

            if(res.getStatusCode() == 200 && res.getBody() != NULL){
                String contactJSONResponse = res.getBody();
                system.debug(contactJSONResponse);
                return contactJSONResponse;
            }
        }
        return null ;
    }
}
Xero Invoices
Reading Invoices
Use the following code to retrieve Xero Invoice(s) information from Xero. You can also access individual Xero Invoice information by specifying the “IDs” parameter within the endpoint.
public class XeroInvoice {
	public static final String apiEndpoint = 'https://api.xero.com/api.xro/2.0/';

    public static String getAllXeroInvoices(){
        String accessToken = XeroAuth.getAccessToken();
        system.debug(accessToken);

        if(accessToken != NULL){
            HttpRequest req = new HttpRequest();
            req.setEndpoint(apiEndpoint+'Invoices');
            req.setMethod('GET');
            req.setHeader('Authorization', 'Bearer '+accessToken);
            system.debug(req);

            Http http = new Http();
            HTTPResponse res = http.send(req);

            if(res.getStatusCode() == 200 && res.getBody() != NULL){
                String invoicesJSONResponse = res.getBody();
                system.debug(invoicesJSONResponse);
                return invoicesJSONResponse;
            }
        }
        return null;
    }
}
You can retrieve individual Xero Invoices with the provided code by including the “IDs” parameter, as shown in the following endpoint.
https://api.xero.com/api.xro/2.0/Invoices?IDs=fee88eea-f2aa-4a71-a372-33d6d83d3c45,9f5bca33-8590-4b6f-acfb-e85712b10217
Managing Xero Invoices – Creation and Update
When creating a Xero Invoice, certain mandatory fields should be provided as per the Xero API regulations. On the other hand, when updating a Xero Invoice, it is crucial to include the “InvoiceID” in the request body.
The code below can be used for both creating and updating a Xero Invoice based on the value of the “isCreate” parameter.
If the “isCreate” parameter is set to TRUE, then the request method will be configured as PUT, otherwise, it will be configured as POST.
public class XeroInvoice {
    public static final String apiEndpoint = 'https://api.xero.com/api.xro/2.0/';

    public static String createUpdateXeroInvoice(Boolean isCreate){
        String accessToken = XeroAuth.getAccessToken();
        system.debug(accessToken);

		if(accessToken != NULL){
			String jsonBody = '{ "Invoices": [ { "Type": "ACCREC", "Contact": { "ContactID": "430fa14a-f945-44d3-9f97-5df5e28441b8" }, "LineItems": [ { "Description": "Acme Tires", "Quantity": 2, "UnitAmount": 20, "AccountCode": "200", "TaxType": "NONE", "LineAmount": 40 } ], "Date": "2019-03-11", "DueDate": "2018-12-10", "Reference": "Website Design", "Status": "AUTHORISED" } ] }';

            HttpRequest req = new HttpRequest();
            req.setEndpoint(apiEndpoint+'Invoices');
            req.setMethod(isCreate ? 'PUT' : 'POST');
            req.setHeader('Authorization', 'Bearer '+accessToken);
            req.setHeader('Content-Type', 'application/json');
            req.setHeader('Accept', 'application/json');
            req.setBody(jsonBody);
            system.debug(req);

            Http http = new Http();
            HTTPResponse res = http.send(req);

            if(res.getStatusCode() == 200 && res.getBody() != NULL){
                String invoiceJSONResponse = res.getBody();
                system.debug(invoiceJSONResponse);
                return invoiceJSONResponse;
            }
        }
        return null ;
    }
}
Alternatives to a Custom Integration
If you find it challenging to write a custom integration with Apex because it lacks LWC components or cannot handle updates, race conditions, or other unusual issues, then consider using Breadwinner’s Xero Salesforce Integration. It has clearly defined costs and can help your business grow and scale quickly.
Alternatively, you can also integrate Salesforce and Xero by using Zapier or Workato.